Original Floor Plan/ Problem
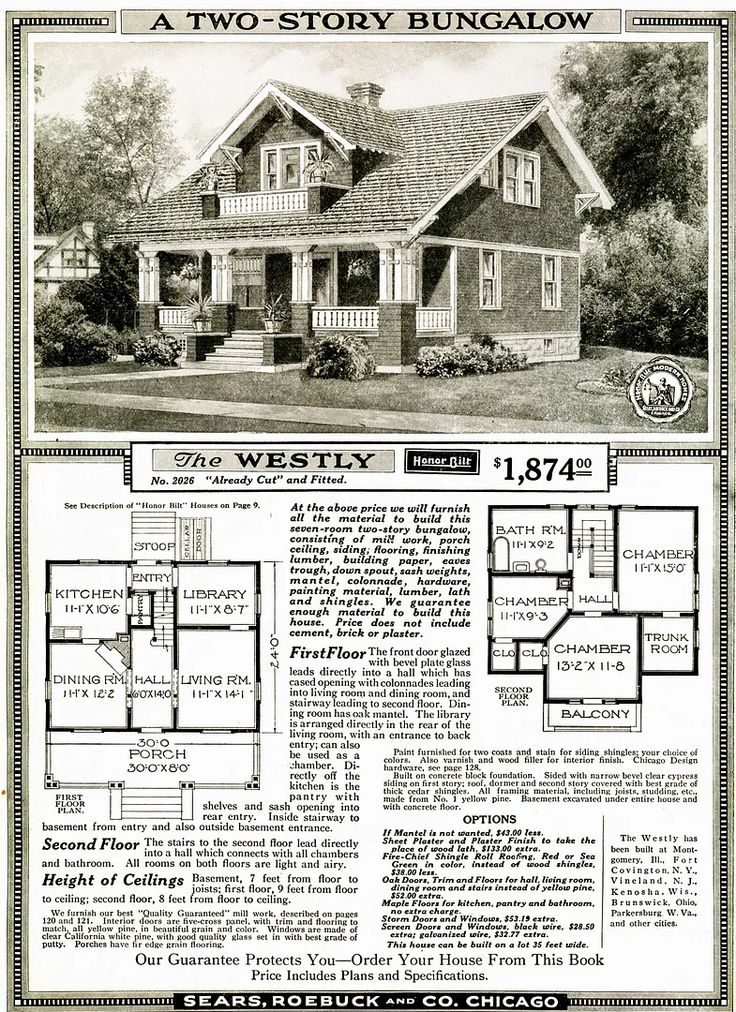
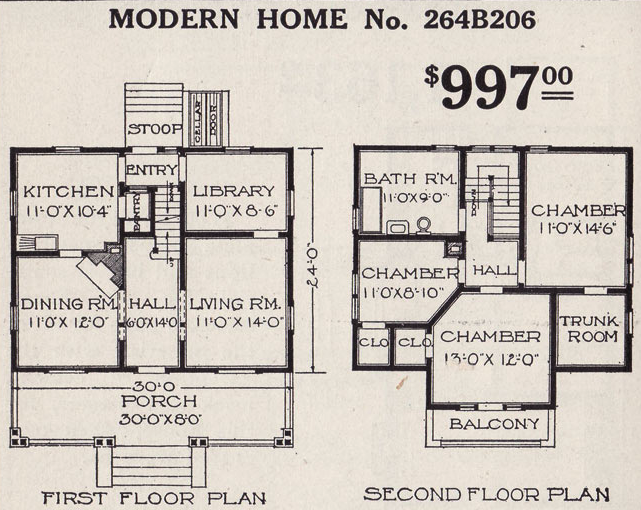
The Westly first appeared in the Modern Homes Catalog in 1913 as Model No. 264B206. In 1918, Sears rebranded it as “The Westly,” giving the model a name instead of just a number. It remained in circulation until 1929, with two alternate versions introduced in 1920. This post focuses on the earliest layout.
*Apparently, The Sears Westly was first offered in the very rare 1909 Sears Modern Homes catalog. It was then known merely as Modern Home #144. It included a vestibule at the entrance, but lacked a balcony on the second floor, which presented slightly different from later versions of this home *
Footprint: 30 × 24 ft gives ~720 sq ft per floor, so the two-story home is roughly 1,400–1,450 sq ft total.
This is a 3 bed/1 bath.
Problem:
The Westly separates private and public spaces—bedrooms upstairs, living areas downstairs—but all three bedrooms share a single bathroom, reflecting early 20th-century ideas of efficiency more than modern notions of personal space.
Walkthrough/ Observation
Walking up to the property, you’re greeted by a sizable covered wooden porch—a perfect spot for a pair of rocking chairs or a small table and chairs. It also serves as your outdoor mud area, handy for everyday life. With four square columns along the porch, the house is painted a light color and clad in narrow siding, with stark white trim highlighting the windows and corners. Cedar shingles on the second-floor gables add texture and warmth, while the dark wood-shingle roof caps the home with a classic, timeless look.
Once you open the oak door with a glazed leaded glass insert (in the early 1900s, the lead most likely contained a small amount of real lead), and step inside, you enter the staircase hallway, which could serve as a foyer. From here, you can go left, right, or up the stairs, but there’s no closet for coats, which feels like an immediate inconvenience.
The doors to the left and right are pocket doors, sliding into the walls to save space and allow rooms to feel connected when needed. The centered staircase helps organize the home but also leads to room-to-room layouts, a clear difference from the open-concept spaces we favor in modern homes today.
Going left from the foyer, you enter the dining room. In one corner, near the kitchen, sits a cozy fireplace, adding warmth and a focal point to the space. The room could comfortably fit a 6–8 person rectangular formal table and a short and shallow credenza to store plates and cutlery sets.
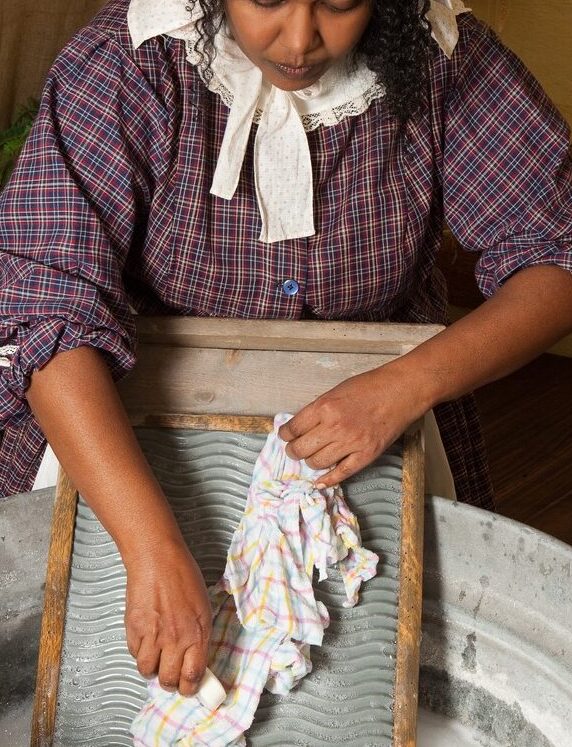
The kitchen sits just off the dining room, a logical placement for meal prep and serving. Although it’s a generous 11 feet × 10’4″, the space is still compact and functional, with a sink and a gas range (or wood/coal stove). It’s enough for everyday cooking, though not ideal for preparing a large dinner. The extra space might also have accommodated laundry tasks, with scrub washboards and tubs for washing clothes and line drying outdoors, as washing machines weren’t common until the 1950s.
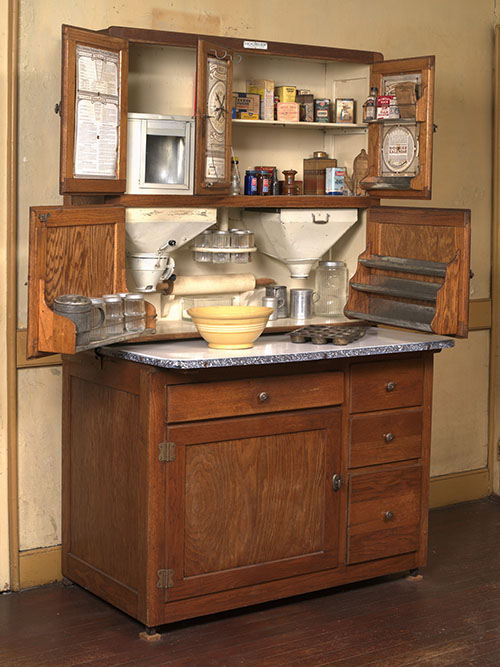
Wealthier occupants might have added a Hoosier cabinet or a small work table to increase storage and prep space. The Westly kitchen also includes a pantry that extends alongside the foyer staircase, providing some much-needed storage.
The entryway off the kitchen mainly serves as a back or service entrance, perfect for bringing in groceries, firewood, or coal. At the time, automobiles were still considered a luxury item, so the Westly didn’t include a garage or driveway—this door wasn’t meant for cars, just for practical household use. The presence of a service entrance reflects the middle-class focus of Sears homes, designed for efficiency and everyday life rather than luxury.
The library itself is a cozy retreat tucked away at the end of this entryway. Bookshelves line the walls while a small desk provides space for writing, correspondence, or household tasks.
Just off the library, you enter the living room, the largest room on the first floor and the heart of the home’s public space. Hardwood floors run throughout beneath modest area rugs, and multiple windows fill the room with natural light. It comfortably accommodates a settee (today’s couch), chairs, and occasional tables, making it perfect for family gatherings or entertaining guests. With the foyer nearby and the central staircase within reach, the living room connects smoothly to the rest of the first floor while keeping the main social areas at the front of the home.
Day guests are naturally limited to the shallower part of the house—the dining room and living room—close to the main entrance, leaving the private areas in the back and upstairs more secluded. Notice there’s no half bathroom on the first floor; with only one full bath upstairs, guests would generally use facilities at their own homes, reflecting both the era’s design norms and middle-class practicality.
Climbing up the central oak staircase, you reach the private family spaces of the Westly. All three bedrooms are located on this floor, connected by a hallway that also provides access to the only full bathroom in the house. Closets are small, except for the bedroom adjoining the trunk room, and there’s no clear hierarchy among the bedrooms—each is fairly equal in size. The single bathroom can create a bottleneck for the family, showing that the design prioritizes maximizing the number of bedrooms over functional convenience, a common approach in middle-class homes of the era.
My Proposed Fixes
First Floor Updates
- Remove the dining room walls and convert the space into a larger, open living room.
- Open a wall to the kitchen to improve flow and natural light.
- Upgrade the kitchen with modern essentials: added cabinets, counter space, a six-burner gas cooktop, electric oven, sink, and dishwasher.
- Convert the library into a downstairs bedroom for flexibility.
- Add a small full bathroom by carving space from the former living room.
- Turn the former living room into a flex space (office, lounge, or playroom).
- Relocate the fireplace to a side wall so it becomes a focal point when pocket doors are open.
- Expand the rear stoop into a larger deck, creating usable outdoor living space.
Second Floor Updates
- Slightly reduce the main bathroom size to free up usable square footage.
- Add a washer/dryer in the bathroom.
- Expand the adjacent bedroom by 1–2 feet using reclaimed space.
- Extend the front bedroom closet.
- Label this room as a junior suite.
- Convert the balcony bedroom into a primary suite:
- Add a private full bathroom using closet space
- Redirect trunk room access through this bedroom
- Improve the third bedroom by adding a proper closet.
- Maintain a hall-accessible bathroom for shared use.
Structural / Cost Considerations
- Remove the basement, but keep the porch — excavation costs today are high, and the original need for coal storage, large furnaces, and utility space is no longer relevant.
- Expand the rear stoop into a larger deck — turning a simple service entry into usable outdoor living space.
- Relocate HVAC to the attic — modern electric systems eliminate the need for basement mechanical space.
- Install a tankless water heater near the kitchen — reducing space requirements and improving efficiency.
- Place the electrical panel in the pantry — keeping it accessible but discreet, while centralizing home systems.
- Add soundproofing between floors — improving privacy and comfort, especially with bedrooms above living spaces.
Forgot to Mention
Shorten the pantry slightly to carve out a coat closet in the foyer. This adds a much-needed drop zone right at the entrance—something the original layout completely lacked.
The Result
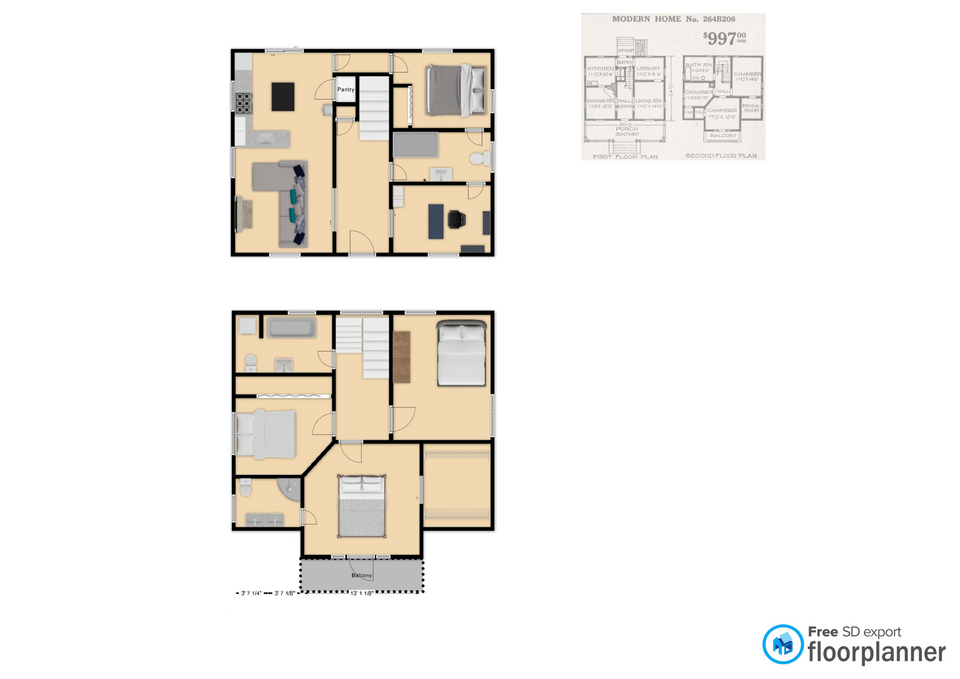
*In the image, second floor is slightly longer than the first. I know, but personally, it was hard to match floor dimensions in this free tool, floorplanner*
With these updates, the Westly is transformed from a 3-bedroom, 1-bath early 20th-century layout into a modern, fully functional home:
- 4 bedrooms + flex space
- 3 full bathrooms (including a primary suite and junior suite)
- Open, flowing living and kitchen areas with modern appliances and storage
- Cozy, functional first-floor entry with a coat closet
- Outdoor deck for extended living
- Modern systems tucked efficiently—HVAC in the attic, tankless water heater near the kitchen, and electrical panel in the pantry
- Soundproofed floors for privacy
- Bedrooms upstairs are now comfortable, properly sized, and well-served by bathrooms and closets
What was once a charming but constrained home with bottlenecks, tiny closets, and a single bathroom is now a layout that balances modern convenience, privacy, and practicality, while keeping the Westly’s classic character intact.
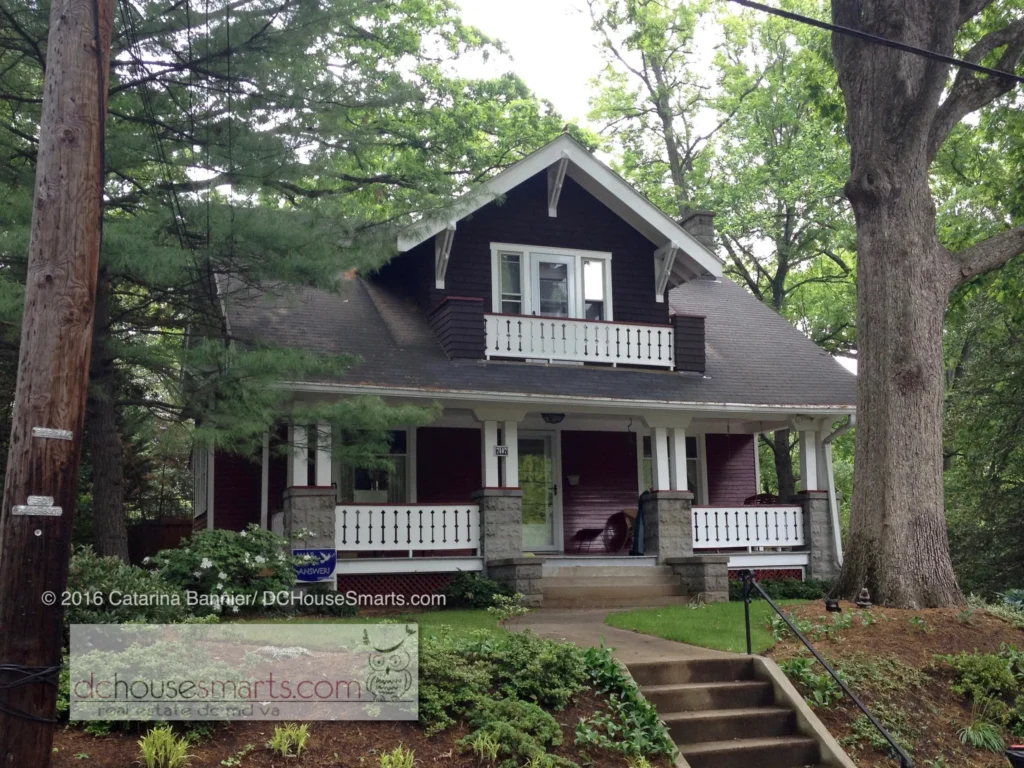
A known Westly House Kit in Washington DC. Picture sourced from https://dchousesmarts.com/
If you were updating the Westly for today’s needs, what would you do differently? Would you prioritize more bathrooms, larger bedrooms, an open kitchen/living flow, or preserving the original details?
What matters most to you when reimagining a historic home—function, style, or a mix of both?